I just read a post on the TeachPaperless blog that I thought was very interesting. The author posted opinions from students on the use of technology in the classroom. I thought this was a great idea so I polled one of my classes on their thoughts. Here is what they had to say:
Student 1 - I like doing internet research and creating PowerPoints for assignments. I also like the online labs we do. I really like the class web site because it has links to help sites and I can always check it to see what the homework is or what I missed.
Student 2 - I like working on the computers but I wish we could do more real labs. The computer labs are ok, but real labs would be better. I know its because of money, but I think they should find the money to get us the lab equipment.
Student 3 - I like doing the practice work on the computer because it gives me a grade right away and it also has a help feature that will help me through the problems.
Student 4 - I love having the extra credit work to do on line. It is so cool. I go to the site, do the problems, and the answers get emailed to my teacher for grading. I was only doing it for extra credit, but I found that it helps me study too.
Student 5 - I would rather write 10 pages on a computer than 2 by hand. I also like using the graphing programs to create graphs instead of doing them on paper.
Overall, the students were very positive about using technology in class to do work. This quick, informal poll (just write down your thoughts on a piece of paper) has shown me that I should continue to use technology in class and add some more technology to the classes also.
Tuesday, March 31, 2009
Sunday, March 29, 2009
TUTORIAL 26 MELAKUKAN CHAMFER DALAM AUTOCAD
BDV-654115-BDV
Dalam pelajaran autocad kali ini, autocad tutorial akan melanjutkan pelajaran autocad kita dengan membahas cara men-chamfer dalam bidang layar kerja autocad.
Chamfer dalam autocad adalah teknik mematahkan sudut objec menggunakan garis.
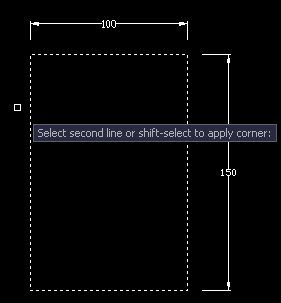
Mari kita mulai saja pelajaran autocad kita kali ini. Silakan anda buat kotak dengan ukuran 100 x 150, seperti gambar berikut ini:
Chamfer dalam autocad adalah teknik mematahkan sudut objec menggunakan garis.
Mari kita mulai saja pelajaran autocad kita kali ini. Silakan anda buat kotak dengan ukuran 100 x 150, seperti gambar berikut ini:

Kotak di atas akan kita chamfer (patahkan sudutnya) dengan panjang garis 50 , silakan ikuti tutorialnya sebagai berikut:


Ketik Panjang garis 2: 50 - enter

 Klik garis vertikal, maka hasil akhirnya akan menjadi seperti gambar di bawah ini:
Note:
Untuk menentukan garis mana yang anda klik pertama kali apakah vertikal/horizontal sebenarnya tidak ada aturan baku, tapi ini akan berhubungan dengan panjang garis 1 & 2 yang anda masukkan untuk men-chamfer. Pada contoh di atas karena garis 1 & 2 panjangnya sama maka tidak ada masalah garis mana yang anda klik pertama kali. Silakan anda coba memasukkan panjang garis yang berbeda untuk men-chamfer sudut lainnya di kotak contoh di atas.
Download latihan chamfer: Download
Wednesday, March 25, 2009
TUTORIAL 25 OFFSET DI AUTOCAD
Dalam pelajaran autocad kali ini, autocad tutorial akan melanjutkan pelajaran autocad kita dengan membahas cara mengoffset dalam bidang layar kerja autocad.
Offset dalam autocad adalah teknik menduplikat objec dimana hasil duplikatnya akan sejajar dengan objec awal dengan jarak yang sudah kita tentukan.
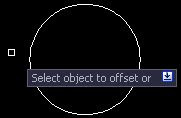
Tanpa memperbanyak keterangan kita mulai saja pelajaran autocad kita kali ini. Silakan anda buat lingkaran dengan R50 berikut ini:
 Lingkaran di atas akan kita duplikat kearah dalamnya dengan jarak 10, silakan ikuti tutorialnya sebagai berikut:
Cara mengoffset lingkaran :


akan muncul perintah seperti gambar di bawah ini :


Pointer mouse akan berubah menjadi kotak, seperti gambar di bawah ini:
Klik objec yang akan kita offset, objecnya akan berubah menjadi garis putus-putus, seperti gambar di bawah ini:
Klik ke arah objec akan di duplikat ( di praktek ini ke arah dalam lingkaran), maka duplikatnya akan menjadi seperti gambar di bawah ini:

Satu kali perintah bisa kita gunakan berulangkali untuk offset jarak yang sama.
Dowmload latihan offset: Download
Tuesday, March 24, 2009
Professional Development ideas
Professional development is constantly listed as a major factor in improving teaching and learning. Effective professional development is not always delivered and funds are sometimes wasted. A survey by Education Week shows that 77% of respondents feel that their schools and districts do not use professional development funds effectively. In today's financial crisis, this is a major issue. So, how do you deliver effective professional development with less funding? How do we make sure that professional development is timely, interesting, and relevant?
The first option to save money is to use in-house "experts". There is no need to go to expensive outside contractors and consultants when you probably have staff with a wealth of knowledge and expertise in your own building. Look for staff who have extra experience or knowledge in technology, curriculum development, tips and tricks, and other ideas. Have them run professional development sessions. In lieu of payment, offer them double CEU credits or other incentives that are free or low cost. Talk to local businesses about donating gift cards or items to your school and use those, or buy them at a discount. Even if you pay them contractual rates for this kind of thing, it will still be much less expensive than bringing in an outside person.
Another idea is to utilize some of the free professional development available on line. Many conferences have virtual conferences that faculty and staff can attend for free on line. Some colleges and professional development providers offer sessions online for free or reduced fees. You can also give staff a list of web sites that go over the material you want them to gain experience in and then give them time to review the sites.
A great resource that I use is the Teacher Professional Development Sourcebook, from the publisher of Education Week. It is available for free in print twice a year, and also available online. They have great ideas, articles, tips, and resources for professional development.
Some other resources online include:
Connected University - over 60 courses available on the site, including technology integration, educational leadership, and curriculum. A yearly fee provides access to all classes.
Edutopia - These free teaching modules, developed by education faculty, can be used for workshops and meetings.
iSafe - free training for educators in Internet safety.
JASON - Jason, part of the National Geographic Society, has online professional development on its science curricula.
Microsoft Office Online - free, self-paced training courses for Office 2003 and 2007.
National Endowment for the Humanties - grants for teachers
PBS Teacherline - online professional development
Look for educational websites and magazines that offer free web casts. Use these web casts, either live or archived, as a way to present information to your staff.
This is just a small list of professional development resources available. Have your professional development committee do some Internet searches, check out the Teacher Sourcebook, and see what you can find to improve your professional development offerings without increasing your budget.
When planning Professional Development, make sure you involve a group of teachers in the planning. Have some veteran teachers, mid-career, and newbies in the group to make sure your professional development plans address all of their needs. Work on a small number of topics each year instead of dropping 10 different topics on the teachers with no time to implement or get follow up. Zero in on initiatives that are already in place and help teachers implement them in their classroom. Don't try to bring in every new idea or initiative as this will overwhelm your staff and let to none of it getting implemented. Get feedback from the faculty and staff on what kinds of training they need and want. Use a survey, or other feedback device to get their needs and wants to use when planning the years training. If teachers are involved in the planning and decisions, you will get more buy-in during the training.
Make sure that every professional development session ends with practical tips on how to implement the idea, topic, or initiative in the classroom. Teachers need to know why this is a good thing to do and how to use it in their classroom. Concrete, specific examples are a must.
When teachers attend off-site training, have them come back and present what they learned to the rest of the staff. Set up a blog where these teachers can post their notes and observations for others to see. Post links to the training provider's web site for reference. Teachers can even post to the blog while they are at the event.
Remember that one size does not fit all. Tailor some professional development by subject area or grade. This will lead to more concrete examples of how to use the training in the classroom. Have people from these areas do the planning also.
Integrate professional development with your normal staff meetings. Have one great idea or tool or tip presented at the end of the meeting. If your meeting agenda is short, have a short professional development session during the meeting too. It's amazing how much can be accomplished in 20 minutes.
Embed professional development in the daily schedule. Emails of tips, ideas, and resources should be sent out to the staff. Have other teachers and staff available to help teachers implement what they've learned. Set up a staff blog for teachers to contribute to.
Many teachers will attend training events that are not necessarily run by official CEU providers. Come up with a way to have that training count towards their professional development requirements. Many times, this type of training is free, but teachers are hesitant to go to it because it will not count.
Some professional development sessions can also be reserved for collaboration time. Give teachers time to meet and work in groups to share ideas, tips, struggles, and triumphs. Also give them time to plan how to implement what they've learned in professional development sessions into their classroom. If teachers are not given this planning time, they may never use what they have learned.
Another idea I've seen recently is to have some students attend some of the professional development sessions and use these students as assistants to help implement some of the new ideas. These students can also give feedback on any ideas they have or any challenges that they may see in using that new idea in class.
Technology is a big part of education now. Teachers need to know how to use technology to improve teaching and learning and professional development must address this. In Connecticut, teachers are required to attend training in educational technology. Have teachers who already use technology teach other faculty about it. Send one or two teachers to train-the-trainer sessions so that they teach the rest of the staff. Have a technology open support session where technology savvy teachers, educational technology specialists, and IT staff are on hand to answer any and all questions teachers have or help them with new technologies that they have been working with.
Remember, the goal is to give teachers interesting, timely, relevant professional development that can help them improve the teaching and learning in their classroom. It should be easy to implement, have specific examples of how to implement, and have support and follow up resources available to the faculty. Make professional development something that the teachers look forward to and want to attend and make sure that they have time to plan out their implementation.
Sources of research: Teacher Magazine, TechLearning.com, Edutopia.org.
What colleges and employers are looking for in graduates
I just read some research and articles about what colleges and employers are looking for in graduates. Content knowledge was 5th or 6th on the list. They both want to see well-rounded students, with a variety of skills.
They both want students who have:
1) academic achievement
2) work experience and internships
3) clubs and organization membership that shows leadership
4) community service
The reports all say the same thing about other skills colleges want students to have:
1) communications - personal and electronic
2) teamwork skills
3) problem solving skills
4) critical thinking skills
Employers have also said that they expect students to have a basic knowledge of internet research, computer operating system use, and office productivity software.
This means high schools and colleges have to teach our students all of these qualities and skills as part of our curriculum.
One way we can do this is through using technology in the classroom, project based learning with hands on projects, cooperative learning where students work in teams and help themselves.
We can also motivate our students by letting them know what colleges and employers are looking for and by helping them understand what they are learning, and WHY they are learning it.
Text messaging and more for hearing impaired students
In the past, deaf people couldn't communicate over distances without special phone setups. Then email came and made communicating easier. Now text messaging (with photos too) makes it very easy. What about for our students?
I would bet that a majority of your students have cell phones with text messaging capabilities. If they have a good plan, the text messages don't cost them a fortune. We could then use text messages to get them information. I've had hearing impaired students, and I have tried different techniques to help them out. With some of the new technologies out now, it will be easier the next time I have a student with hearing issues.
I can send them a text message of the lesson plan so that they can read along, and I can record the class and post it as a pod cast for them to download and listen to later. I can also print out a lesson presentation for them. If they have smartphone, I can send them a pdf version of the lesson presentation and materials and they can just read them on their phone.
Technology has made communications easier and this leads to easier accommodations for the hearing impaired.
Monday, March 23, 2009
Students' Education Proclamation
Converge Magazine, along with Project Tomorrow, came up with this Students' Education Proclamation.
http://blogs.convergemag.com/students_proclamation/2009/02/the-student.html
I think it is a great tool to use as guidance for creating the new face of education. Students need these things in order to be successful. They don't need to spend hours and hours taking standardized tests that really don't test anything useful.
In today's world, anyone can find any information in an instant. What is needed is the ability to analyze that information for reliability and accuracy, and then apply it to something else. Students need to be able to communicate, collaborate, do research, analyze and synthesize information, and solve problems.
Let's use this proclamation as a way to change education to make our students more prepared for the world.
Using the Web to get Organized
The World Wide Web is such a great thing. I think everyone agrees that the internet has changed our world. A variety of tools out there allow you to use the Web to get yourself and your life organized. The other nice thing is that you only need access to the internet to do this. Any web-enabled cell phone, smart phone, or computer gets you access to these free resources.
One of my favorites is Google. All of these are available in mobile mode so that I can access them from my smart phone. I use Google Reader to keep up on my RSS feeds, Gmail to check email and my task list, Google Notebook and Docs to create and read notes and documents, Google Calendar and Google search. These applications allow me to stay organized, informed and in contact with people.
I also use Evernote, which is a great, free resource to take notes. What I really like is the ability to clip web sites to the notebook on Evernote. It is available as a desktop version, web version, and mobile version. The desktop version syncs with the online version so that you always have your notes with you. A very unique feature it has is the ability to search for text in a photo, which is very useful for me when I take a picture of a memo with my smart phone camera.
If you have some kind of web based email, it may have a calendar, tasks, and notes section to use. Microsoft Outlook Web access does, as does Google Mail and Yahoo mail.
Some other great online organizational services include: Remember the Milk, iPrioritize.com, pimonline.com, Jott, and Agenda at Once.
There are a lot of great resources and systems available. Check each one out and see which fits your needs and style the best. Look at ease of use, backup features, mobile access, and cost. Then choose one and get organized.
TUTORIAL 24 LATIHAN CARA MEMBUAT LINGKARAN DI AUTOCAD
Autocad tutorial kali ini akan memberikan anda latihan evaluasi dalam hal menggambar objec lingkaran.
Dalam latihan ini semua teknik lingkaran yang sudah kita pelajari dapat anda pakai semua. Latihan ini bersifat mandiri dan bila anda berhasil / dapat mengerjakan berarti materi yang ada dalam autocad tutorial dapat anda serap dengan baik. Bila tidak berarti anda perlu latihan lebih banyak lagi. SELAMAT LATIHAN
silakan anda download latihannya: Download latihan
Friday, March 20, 2009
Help - that file is in the wrong format!
Students, teachers, and schools don't always have the same software to use for work. When this happens, there is sometimes an issue with compatability and opening the file on another computer. For example, a student emailed a paper to her teacher. The student used Microsoft Works to create the file. The file extension is .wps for this type of file. The teacher was unable to open the file because her computer did not have Microsoft Works. So, what do you do?
When you try to open a file with an extension your computer doesn't recognize, it will usually give you an error message and a window with a choice to either let the computer search for software to open the file, or let you pick the software. I always pick the software. How do I know which software to pick? I use the software that I have that I would use to create that type of file. If it is a document, I will try to open it using Microsoft Word. If it is a spreadsheet, Excel, and so on. If I have no idea, I try using Word first. Once the file is opened and you can view it, you can "Save As" the file to a format that you use.
In this case, I used Word to open the Works file, and then saved it as a Word document and gave it back to the teacher. She can now read and comment on the paper using Word.
If you try this and it still doesn't work, try letting the computer search for a program to open it. If that doesn't work, look at the file extension (the three letters after the . ) and do an online search for that extension. You can then see what software was used to create the file and search for tips on how to convert it for your own use.
Thursday, March 19, 2009
Internet Explorer 8 is out
I just installed Internet Explorer 8 and so far, so good. It is definitely faster than IE7. I also like that IE7pro works fine with it and that each tab is it's own instance. This means that if one tab locks up, the whole IE8 instance doesn't lock up.
It is rendering pages accurately and quickly and so far I like the way it works. I'll let you know how it goes after a week or so as I find out more about what it can do.
It is rendering pages accurately and quickly and so far I like the way it works. I'll let you know how it goes after a week or so as I find out more about what it can do.
Wednesday, March 18, 2009
Fitting in Technology
There is a great article on the TeachPaperless blog about not trying to "fit in" technology into your curriculum, but to use technology to enhance or improve your curriculum. It is a great article that will help teachers who have some questions about integrating technology into their classroom.
http://teachpaperless.blogspot.com/2009/03/educational-technology-dont-fit-it-in.html
http://teachpaperless.blogspot.com/2009/03/educational-technology-dont-fit-it-in.html
Free Virtual Educational Technology Conference.
This link is for a virtual (online) educational technology conference on April 23rd. That is a half day for us for report card conferences. It is free, but you must register at the site below. You can particpate in all, or part of the conference and conference materials will be available for 3 months afterward for download. Check it out!
http://virtual.fetc.org/Microsites/FETC-Virtual-09/about.aspx
http://virtual.fetc.org/Microsites/FETC-Virtual-09/about.aspx
TUTORIAL 23 CARA MEMBUAT LINGKARAN (BAGIAN 3) DI AUTOCAD
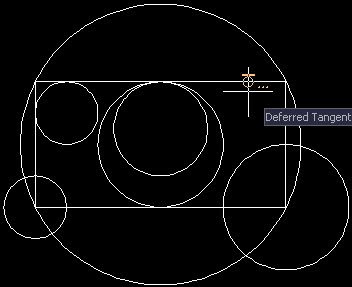
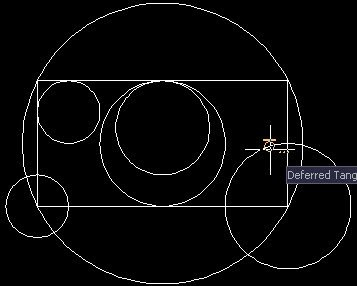
Dalam pelajaran autocad kali ini autocad tutorial akan melanjutkan pelajaran autocad yang kemarin yaitu cara membuat lingkaran. Nah dalam pelajaran autoacad kali ini kita akan membahas tentang cara membuat lingkaran menggunakan tangen-tengen-radius (garis singgung-garis singgung-radius) dan membuat lingkaran menggunakan tangen-tangen-tangen (garis singgung-garis singgung-garis singgung).
Seperti biasa Autocad tutorial tetap akan membahas di sertai dengan gambar, biar anda mudah memahami dan menerapkannnya.
Ok kita mulai aja pelajaran autocad kita kali ini. Silakan anda buka kembali gambar yang kemarin terakhir kita buat. Kalau tidak ada silakan buat kembali rectangle 200 x 100.

GAMBAR OBJEC PRAKTEK TERAKHIR
Cara 5 Membuat lingkaran menggunakan TTR

Ketik: TTR - Enter, seperti gambar berikut :

Klik 2 garis singgung yang kita inginkan untuk membuat lingkaran kemudian ketik radius - Enter .
Dalam praktek kita, ikuti langkah-langkah berikut:
Klik garis horizontal atas kotak, perhatikan titik tangkap (osnap) yang muncul. seperti gambar dibawah ini :

Klik garis vertical samping kiri kotak, perhatikan titik tangkap (osnap) yang muncul. seperti gambar dibawah ini :

Ketik radius lingkaran: 25 - Enter

Nah jadi deh lingkaran kita, seperti gambar di bawah ini:

GAMBAR OBJEC LINGKARAN TEKNIK TTR
Cara 6 Membuat lingkaran menggunakan TAN,TAN,TAN
caranya ikuti langkah-langkah berikut:
Klik Draw > Circle > TAN,TAN,TAN. seperti gambar di bawah ini:

Klik 3 garis singgung yang kita inginkan untuk membuat lingkaran.
Dalam praktek kita, ikuti langkah-langkah berikut:
Klik lingkaran, perhatikan titik tangkap (osnap) yang muncul. seperti gambar dibawah ini :

Klik garis horizontal atas kotak, perhatikan titik tangkap (osnap) yang muncul. seperti gambar dibawah ini :
Klik lingkaran, perhatikan titik tangkap (osnap) yang muncul. seperti gambar dibawah ini :
 Nah jadi deh lingkaran kita, seperti gambar di bawah ini:
GAMBAR OBJEC LINGKARAN MENGGUNAKAN TEKNIK 2P
Saturday, March 14, 2009
TUTORIAL 22 CARA MEMBUAT LINGKARAN (BAGIAN 2) DI AUTOCAD
Dalam pelajaran autocad kali ini autocad tutorial akan melanjutkan pelajaran autocad yang kemarin yaitu cara membuat lingkaran. Nah dalam pelajaran autoacad kali ini kita akan membahas tentang cara membuat lingkaran menggunakan 3 titik dan membuat lingkaran menggunakan 2 titik .
Autocad tutorial tetap akan membahas di sertai dengan gambarnya, biar anda mudah memahami dan menerapkannnya.
Ok kita mulai aja pelajaran autocad kita kali ini. Silakan anda buat kembali rectangle 200 x 100 atau kalau anda masih punya gambar yang kemarin silakan di buka saja biar kita lanjutkan dengan membuat objec lingkaran berikutnya:

Gambar terakhir dari latihan sebelumnya
Cara 3 Membuat lingkaran menggunakan 3 titik
Ketik: C - enter atau klik toolbar circle 
Ketik: 3p - Enter, seperti gambar berikut :

Klik 3 titik yang kita inginkan untuk membuat lingkaran, dalam praktek kita ikuti langkah-langkah berikut:
Klik di sudut kiri bawah kotak yang sudah kita siapkan seperti gambar dibawah ini

Klik di sudut kiri atas kotak yang sudah kita siapkan seperti gambar dibawah ini

Klik di sudut kanan atas kotak yang sudah kita siapkan seperti gambar dibawah ini:

Nah jadi deh lingkaran kita, seperti gambar dibawah ini:

GAMBAR OBJEC LINGKARAN 3P
Cara 4 Membuat lingkaran menggunakan 2 titik
Cara membuat lingkaran menggunakan 2 titik terbagi atas dua bagian yaitu dengan cara :
a. Klik titik 1 dan masukan Diameter, caranya ikuti langkah-langkah berikut:
Ketik: C - enter atau klik toolbar circle

Ketik: 2p - enter
Klik di titik 1 (dalam praktek kita titik midpoint objejec kotak), seperti gambar dibawah ini:

Tarik mouse kearah lingkaran akan kita buat (dalam praktek kita kearah bawah), seperti gambar di bawah ini:

Masukan diameter lingkaran yang kita inginkan (dalam praktek kita diamaeter 75)
Ketik Diameter lingkaran: 75 - Enter
Ketik Diameter lingkaran: 75 - Enter
Nah jadi deh lingkaran kita, seperti gambar di bawah ini:

GAMBAR OBJEC LINGKARAN DIAMETER 75 MENGGUNAKAN TEKNIK 2P
b. Klik titik 1 dan masukan Klik titik 2, caranya ikuti langkah-langkah berikut:


Klik di titik 1 (dalam praktek kita titik midpoint objec kotak), seperti gambar dibawah ini:

Klik di titik 2 (dalam praktek kita titik midpoint objec kotak), seperti gambar dibawah ini:


GAMBAR OBJEC LINGKARAN MENGGUNAKAN TEKNIK 2P
Friday, March 13, 2009
Remember Everything
I found out about Evernote a few months ago, but I hadn't started using it until this week. I wish I had started earlier.
Evernote is free (there is a premium version with more functionality that is fee based) and allows you to capture notes in a variety of formats and then access it from anywhere via the web or a mobile application.
What's really cool about it is that it allows you to take a picture of something, upload it to Evernote, and it can search text in the photo. I love this because there are times when I don't have the time, or ambition, to copy something down, so I'll take a photo of it with my smart phone. Then I can send it to Evernote and search the text of the memo in the photo.
You can also enter notes manually and import notes from other applications. There is a desktop version for Windows and Mac, a mobile web version to use from any web enabled device, an iPhone application, and a Windows Mobile application. The desktop version syncs with the web version so that you can access your data anywhere you can access the internet.
It is a really great application. Check it out at www.evernote.com
Thursday, March 12, 2009
PC to TV
Don't have an LCD projector in your classroom? Have access to a TV with a pretty large screen, even an old one? Then you are all set.
There are devices available that will enable you to show what's on your computer on a TV. You need a PC to TV VGA converter. You plug in your PC video output and audio output into the device and then the other cables get hooked up to your TV. This enables your whole class to see what's on your computer.
I helped one teacher her set that up in her room. She had a very old TV, but we were able to do it. Now she doesn't have to try to sign out a multimedia projector, she just uses the old TV.
Saves money and recycles an old TV.
The converter boxes range in price from around $40 to $100. Wal-mart, Target, Best Buy, Tiger Direct, all carry a version of them.
Smartphone Camera
I keep finding more uses for my smartphone camera. Today I took a picture of a magazine article so that I could read it later, took a picture of a memo on the wall so I wouldn't have to copy down the info, and even took a picture of a website on a computer screen, again so I wouldn't have to write it down.
I then use an application called "BugMe" for Palm OS that takes a screen shot, in this case of the picture, and allows me to annotate it and even set a reminder alarm.
You can do much of this with any camera phone or smartphone. Put that camera to good use.
I then use an application called "BugMe" for Palm OS that takes a screen shot, in this case of the picture, and allows me to annotate it and even set a reminder alarm.
You can do much of this with any camera phone or smartphone. Put that camera to good use.
TUTORIAL 21 CARA MEMBUAT LINGKARAN (BAGIAN 1) DI AUTOCAD
Dalam pelajaran autocad kali ini autocad tutorial akan membahas cara membuat lingkaran, lingkaran dalam autocad tutorial kali ini akan kita bahas semua teknik yang bisa dilakukan. Ada enam cara yang bisa kita lakukan dalam membuat lingkaran yaitu:
- Membuat lingkaran menggunakan Radius
- Membuat lingkaran menggunakan Diameter
- Membuat lingkaran menggunakan 3 titik
- Membuat lingkaran menggunakan 2 titik
- Membuat lingkaran menggunakan titik singgung dan radius
- Membuat lingkaran menggunakan titik singgung
Keenam teknik ini bisa anda pelajari semuanya di autocad tutorial. Autocad tutorial akan membahasnya satu persatu di sertai dengan gambarnya, biar anda mudah memahami dan menerapkannnya. Syaratnya adalah anda harus sudah mengikuti pelajaran autocad dari awal. Bilapun anda langsung belajar di bagian ini juga tidak masalah sech, tapi sayangkan!!!! (hee..he..hee...becanda. its up to you lah)
Ok kita mulai aja pelajaran autocad kita kali ini. Silakan anda buat dulu rectangle 200 x 100 seperti dibawah ini yang berfungsi sebagai kotak bantu membuat lingkaran

Cara 1 Membuat lingkaran menggunakan Radius
Ketik: C - enter atau klik toolbar circle
Klik di sudut kiri bawah kotak yang sudah kita siapkan seperti gambar dibawah ini (berfungsi sebagai titik pusat lingkaran) :
 Tarik mouse kesembarang tempat (jangan di klik), seperti gambar di bawah ini:
 Ketik radius lingkaran: 25 - Enter
 GAMBAR OBJEC LINGKARAN RADIUS 25
Cara 2 Membuat lingkaran menggunakan Diameter
Ketik: C - enter atau klik toolbar circle
Klik di sudut kanan bawah kotak yang sudah kita siapkan (berfungsi sebagai titik pusat lingkaran)
Ketik: C - enter atau klik toolbar circle

Klik di sudut kanan bawah kotak yang sudah kita siapkan (berfungsi sebagai titik pusat lingkaran)
Tarik mouse kesembarang tempat (jangan di klik), seperti gambar di bawah ini:

Ketik Diameter lingkaran: 100 - Enter

GAMBAR OBJEC LINGKARAN DIAMETER 100
Subscribe to:
Posts (Atom)